Sunday, December 04, 2011

Switching to Old Blogger Templates

The instructions that worked for me -

http://www.spiceupyourblog.com/2011/01/how-to-select-old-layout-blogger.html

I did not quite like the new Blogger templates. They seemed to take the focus away from the blog's actual content.
Monday, January 26, 2009

DVD to Xvid


This weekend, after a long hiatus, I resumed work on some of the technical experiments I had since long meant to undertake. Ironically, fever and cold, helped me take that much needed break from work and exercise my technical muscles a little bit. 

The first major experiment I carried out was ripping a DVD and converting it into the Xvid format. A DVD of the movie "Sorry Bhai" (and a really nice movie, I must add) served as the guinea pig for the experiment.

How I did it?

Step 1 - Ripped the DVD using DVD Decrypter.

DVD Decrypter is one of the best free DVD ripping tools available out there. It is "end of life" in the sense that no new versions of it are under development, but version 3.5.4, that I used, did the job fairly well. It is especially reknowned for its capability to copy protected DVDs and removing the region protection feature of the DVD while ripping.


How to use DVD Decrypter?

Download DVD Decrypter from http://www.dvddecrypter.org.uk/. It is a small 878 KB download (proving the adage that great things do come in small packages).

Install it & run it.

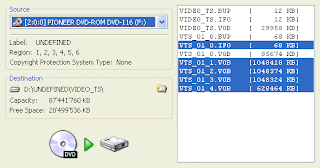
Load the DVD you want ripped in the DVD drive. DVD Decrypter will automatically detect it.

Switch to 'File' mode by clicking on "Mode" > "File".

By default, it will select all the relevant files

Alternatively, you can manually select all the files listed over here.

You can know more about exactly which files to rip if you read about the file structure of DVD Videos @ the websites like -

http://stream.uen.org/medsol/dvd/pages/dvd_format_filestructure.html

http://club.cdfreaks.com/f72/tutorial-dvd-video-file-structure-77646/

http://www.dvd-replica.com/DVD/data-2.php

Once you have selected the relevant files, you can specify a destination folder (make sure that there is ample free space available wherever you are choosing to save the ripped files).

The final action you need to undertake is to Click on the huge DVD to HDD icon to actually initiate the ripping procedure. The entire rip does not take more than 5-10 mins (at least that is how much it took for the DVD that I had ripped).

Step 2 - Covert the ripped file to Xvid (or DivX) format.

For this, you use a took called AutoGK. AutoGK (as the name suggests) completely automates the MPEG Layer 2 to MPEG Layer 4 conversion process.


How to use AutoGK?

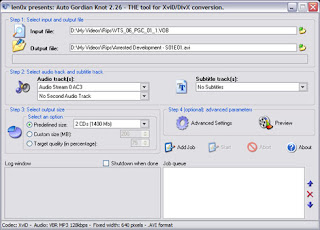
In the "Input File" section, just select the IFO file for the first video tile set (would normally be the VTS carrying the movie) - VTS_01_0.IFO. You can also select an individual VOB file from the title set to encode.In the "Output File" section, specify the name and destination of the output AVI.

You don't need to do anything in particular with the "Audio Track" and "Subtitle Track" sections. Leaving that to defaults will do.

Just specify the output size - selecting 700 MB (the average size of a DivX or Xvid file) might be a good idea.

Once, you have done all this, click "Add Job" and then click "Start".

Please be aware that DVD to DivX (/ Xvid) conversion is a very time consuming process (taking two passes in all). So, much so, that makers of AutoGK have included a "Shutdown when done" option in the AutoGK interface.

That is it, after a couple of hours, while you continue to use your PC for other purposes (except that it slows down the conversion process a little bit), you have a pretty handy 700 MB high quality movie file in your hand which you can be easily shared as a bittorrent.Some relevant websites that talk about the conversion process in greater detail are -

http://www.doom9.org/index.html?/autogk.htm

http://www.ehow.com/how_2309420_use-auto-gordian-knot.html

NOTE - Needless, to say both DVD Decrypter and AutoGK have several configuration options you can fiddle with to improve the quality of the final file. However, for a bare bones rip up and conversion, the instructions given above should suffice.

So, happy ripping to all of you :) Feel free to let me know how does it work out.


Saturday, September 20, 2008

iPhone as a Removable Drive


DiskAid is a wonderful small program that lets you access an iphone's or ipod touch's file system. Using it you can copy off songs from the iphone and also use the iphone as a removable storage device.

You can read more about it at its home page - http://www.digidna.net/diskaid/

Some of its features (as listed on this page are) -

- DiskAid is a Freeware, 100% free of charge.

- PC Windows & Mac OSX compatibility.

- Supports iPhone 1, 3G and all iPod Touch.

- Auto detection feature, just plugin it in !

- Copy Files & Folders between your iPhone or iPod Touch and your Computer

- Files & Folders Browser

- Drag & Drop

- Features rich file organization including folder creation, renaming... etc.

- No jailbreak needed

- Supported firmware versions : 1.1.1 to 2.0.2

Interestingly, I am using it on the firmware version 2.1 and have not faced any problems with it so far.


Thursday, June 05, 2008

CoverFlow in iTunes


This was not supposed to be too large an experiment. A casual encounter with a friend's iPOD Touch yesterday, provoked an interest in CoverFlow - the visual album browsing facility built into various Apple products (hardware or software). As I started reading about it, the power of collaboration, in this case between an artist and a programmer, became more and more apparent to me. Nowhere is this happening more freely than on the World Wide Web. WWW has allowed people from different backgrounds, nationalities... to interact with each other and tap into each other's brains. CoverFlow was created by an independent Macintosh developer, Jonathan del Strother, based upon a concept first introduced by the artist Andrew Coulter Enright in his blog entry "Dissatisfaction Sows Innovation" http://web.archive.org/web/20051225123312/thetreehouseandthecave.blogspot.com/2004/12/dissatisfaction-sows-innovation.html

Since, I do not have an iPOD capable of displaying CoverFlow style album art, I decided to explore it more within the iTunes software itself. I started with attempting to create an album for the movie "Jaane Tu Ya Jaane Na" in iTunes that I could then visually browse through in CoverFlow fashion. The steps followed by me were -

(a) Download all the songs of the movie.

(b) Use Google Images to pick up a cool wallpaper of the movie as album art.

(c) Do a quick batch processing of all the songs of the album to ensure that all of them have the same ID3 tag information and all of them carry the newly selected album art as well.

(You can find the steps to do all this at http://lifehacker.com/software/step-by-step/maximize-coverflow-on-your-ipod-with-itunes-308023.php)

(d) Repeat the same steps for a couple of other music albums.

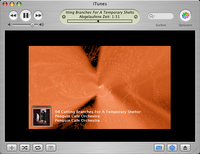
(e) Switch to the CoverFlow view in iTunes, maxmize the same and easily browse through the albums in a cool graphical environment.

APPLE ROCKS!!!

Saturday, May 03, 2008

Hopping Onto the Wifi Bandwagon


Our home is finally wireless enabled. We had been thinking of doing away with the mess of wires for a long time now. It seemed a little inconvenient, having to get into the bedroom each time one of us wanted to check out something on the Internet or, in general, wanted to just surf around. It kinda defeated the entire purpose of possessing a laptop. Last night, I spent close to 3 hours figuring out how to get this setup in place. I am putting in the steps I went through trying to configure our new linksys WRT54G router with a Hathway Cable connection so that someone else may benefit from my experience.

Goal : Get online wirelessly.

Equipment : Motorola Cable modem (supplied by Hathway), Hathway Cable Connection, Linksys WRT54G router, HP Pavillion DV6703Tx laptop running Windows Vista Home Premium.

Steps :

1. Tried using the CD supplied with the Linksys router to configure the wireless network. Got stuck at step 6 while trying to "detect the computer settings". It kept prompting for a password. A quick google search revealed that many linksys users had, in fact, reported facing the same problem. Someone, recommended doing a reset on the router. Tried that... unfortunately, it did not work :(

2. Decided to chuck the CD, roll up my sleeves & do it the dirty way. First connected the router to the modem, then used the CAT6 supplied with the router to connect it to the RJ45 on the Pavillion. Hathway provides static IP addresses to its users (why?). Set the properties of the LAN connection on the laptop to "Get an IP address automatically". The DHCP server in the router, assigned an IP address to the laptop. Fired up IE & logged into the admin page of the router using -

http://192.168.1.1/.

The username field is to be left blank & the default password is "admin".

3. Went under Setup > Basic Setup tab.

Specified the IP address, Subnet Mask, Default Gateway, DNS server 1 & 2 supplied by Hathway under Internet Setup.

The only other change made on this page was to the Time Settings.

4. Went to the Wireless > Basic Wireless Settings tab.

Changed the SSID to what I wanted.

Went to the Wireless > Wireless Security tab.

Changed the Security mode to "WPA Personal". Specified a WPA Shared Key (a passphrase).

Forgot to mention, the linksys admin page needs you to click on the Save Settings button everytime you make any changes to the page.

5. Went to the Administration > Management tab & changed the default password for the router's admin page.

6. That is it... Turned on the wireless button & "Viewed the Available Wireless Networks" on the laptop. It detected the wireless network I had created & also connected to it without a hitch. So far it all semed pretty good. Tried to fire up IE & go to Google. Oops! "Page cannot be displayed". :((

7. That is the point where I was suddenly left clueless. Shouldn't the router, by default, act as a gateway & allow me to connect to the Internet through it. Dismantled the entire setup, used the old wired way to go online & did some more googling. Finally figured out that some ISPs associate the IP addresses they supply with the MAC address of your computer's NIC. Same is the case with Hathway. There are two way to get around this -

(a) Call up your ISP and ask them to reset your MAC address in their records. NOTE - This must be done WITH the router connected to the modem.

(b) Clone your NIC's (wired) MAC address on the router using the "Clone your PC's MAC" option given under the Setup > MAC Address Clone" tab.

I chose the first option. A quick call to Hathway later (Thank God for 24*7 tech support!), I was next to bacchi, in our living room, surfing the Net, in peace, wirelessly. :)

Thursday, January 11, 2007

Digital Rights Management (DRM)

In this post, I will be talking about DRM (Digital Rights Management) in context of music files.

What is DRM?
The simplest explanation of DRM (devoid of the ususal Microsoft style crap) can be found here:

"DRM is computer code that can be embedded in music and video files to dictate how these files are used.
The best-known example is the music Apple Computer sells at its iTunes Music Store. Using a DRM system it invented called FairPlay, Apple has rigged its songs, at the insistence of the record companies, so that they can be played only on a maximum of five computers, and so that you can burn only seven CDs containing the same playlist of purchased tracks. If Apple hadn't done this, the record labels wouldn't have allowed it to sell their music."

http://ptech.wsj.com/archive/ptech-20051020.html

Another example of DRM is the Microsoft's Playforsure initiative. Playforsure was a way for Microsoft to negotiate a deal between the record companies (who owned the songs) and the portable media player manufacturing companies. Simply put, if you download DRMed music from an online music store that carrries the Playforsure logo (e.g.- Napster), it will only (and definitely) play on any portable media player carrying the same logo (e.g.- Creative's Zen Media Player). Read more about Playforsure at -


While Apple sells DRMed music from its online music store - Itunes music store, in the AAC format, Microsoft specifies the WMA format for its playforsure certified music files. MP3 format has thankfully been spared from any DRM style limitations.

Another interesting piece of news, that has created quite a lot of furore on the Internet, is that Microsoft's own portable media player - Zune, is not playforsure certified. While, Microsoft earlier sold DRMed music through its online music store MSN Music, it has now chosen to discontinue that and rather migrate to an Apple like model - it now owns the music store selling the media (Zune Market Place) AND the portable media player which will play that music (Zune). This is quite a radical departure from its earlier portrayal of a 'narrow' itunes universe (actually 'not-so-narrow' if you look at Apple's online music store's market share) v/s a 'big' playforsure rest of the world.

Why is DRM so controversial?
Simply because it puts restrictions on the way you copy, play, burn, transfer music that you legally paid for. That does not really gel with the basic Internet philosophy of restriction less sharing. Check out more about DRM and some examples of DRMed files at -


Wednesday, January 10, 2007

iPhone

This is amazing - a gadget that truly combines style, innovation and futurisitic technology, in a radically simple design. The design, in fact, seems to take the KISS concept to the very heart. Now, this is what I call - beautiful!!!!!!!!!

A picture is worth a thousand words. Take a test drive of this phone @


Also, read the transcript of the MacWorld 2007 keynote address @


Now, I know what to ask Santa Claus for the next christmas (the phone is expected to be available in the Asian markets sometime next year) :)

Saturday, November 18, 2006

Bluetooth Ahoy

We recently invested in a mid range Samsung mobile, Samsung X630. The most attractive feature of our latest acquisition was that it supports Bluetooth. Needless to say that from day one, I always meant to check the Bluetooth capabilities of this phone. Spread over a week, piece by piece, we got the opportunity to discover the hither-to unknown world of Bluetooth. Let me take you through our fascinating journey of exhilarating successes and nerve racking failures...
Our first step was to acquire a Bluetooth dongle. Fortunately bacchi was able to arrange one for us from one of her colleagues. We started with discovering the capabilities of the Bluetooth protocol stack built into Windows XP Service Pack 2. In fact, that is also when we first learnt that when Microsoft introduced Windows XP, they, in spite of being a Bluetooth SIG signatory, considered Bluetooth adoption so meagre, that they purposefully left out support for it in their Operating System. Microsoft's Windows XP SP2 bluetooth protocol stack, though, a boon for cheap bluetooth dongle users (like us), who do not have Widcomm drivers bundled with their dongles, has loads of limitations. More apparent of these, as we discovered, were -

(a) Inability on the part of our mobile to detect our desktop PC. Because of this, we were forced to stick to simplex file transfer (desktop to mobile only). From what I read on Net, I found that several other users had reported a similar problem with their mobiles. While there IS a Microsoft article which seems to talk about this and gives suggestions to fix it ("Turn Discovery On" in Bluetooth properties), it did not seem to somehow work in our case. However, as a first step to resolving this kind of a problem, you can read this article at -

http://support.microsoft.com/kb/870882

(b) Microsoft's Bluetooth protocol stack does not carry support for Bluetooth profiles like using a Bluetooth headphone, Voice Gateway etc. I HAVE used the Microsoft Bluetooth drivers to print to an HP OfficeJet 7410 All In One, so I know that works (more on that later). But, I don't know how effective is stuff like Dial Up Networking using the built in drivers. You can read all about the basics of Bluetooth capabilities of Windows XP SP2 at the following link -

http://support.microsoft.com/kb/883259#5

Also, some troubleshooting tips for Microsoft Windows XP SP2 Bluetooth stack can be found at -

http://support.microsoft.com/kb/883258

http://support.microsoft.com/kb/840635

Once, we had discovered that Microsoft's Bluetooth Protocol Stack was so painfully inadequate for our purposes, I decided to do some more googling in this regard. That is when, I came across this forum discussion -

http://www.howardforums.com/archive/topic/563654-1.html

It seems strange how sometimes a simple discussion between a group of individuals can turn your life around and open your eyes to an entirely new world. The most important part of this post was that it gave us a link to the Widcomm Bluetooth drivers version 5.0.1.801. These drivers are hosted at driverguide.com (which requires you to register free of cost to download them). I downloaded these drivers (it is a hefty 42 MB download) and began installing them, without much hope that they will work. Why? It seems that though most Bluetooth devices use the Widcomm protocol stack based drivers, each device has its own version of the drivers. There is no universal Widcomm driver as such which can be used with ALL these devices. Interestingly, installing these Widcomm drivers is also not as easy as downloading and simply executing the setup. Because these drivers are NOT WHQL certified, it seems the Microsoft Windows XP drivers take precedence over them. Hence, the moment you plug in the Bluetooth dongle, the Windows drivers take over. So, when the Widcomm drivers installation routine asks you to plug in the dongle, you need to click on 'Cancel' and continue the installation without plugging in the Bluetooth device. Only once the installation is complete can you plug in the dongle and then follow a set of routines to "update" the Bluetooth device's drivers to Widcomm's. Read about this at -

http://support.microsoft.com/kb/840635

It is also demonstrated beautifully, with pictorial representations, in the pdf document available at -

http://www.e-beam.com/support/Switching_from_MS_Driver_to_WIDCOMM.pdf

Interestingly, the drivers I downloaded, did not require me to manually update the Bluetooth drivers as mentioned in these articles. All I had to do, was to

- Download the drivers and execute them.
- Click on Cancel when asked to plug in the Bluetooth dongle.
- Once the installation was done, plug in the dongle and let the Widcomm drivers configuration routine automatically take over.

So, what did the Widcomm Drivers give us access to?

The Widcomm drivers created a new icon on our desktop and in the Start menu - "My Bluetooth Places". The features accessible via this link included -

(a) Being able to browse the files and folders made "Bluetooth Visible" on our mobile phone. We could also simply drag and drop files from the mobile phone to our desktop's hard drive. Also, since our mobile phone could now detect our desktop successfully, we were finally able to transfer files from our mobile phone to our desktop.

(b) A feature known as "Voice Gateway". Once, 'connected' to it, you can receive and answer your cell phone calls using the headphone and Mic connected to your computer. So, you no longer, have to tear away your headphone + mic combo to answer that all important phone call on your mobile. When you receive a call, you will automatically get a prompt on your computer, asking you if you want to accept the call. Once accepted, simply jab away on your combo.

(c) Though, this is a feature, we haven't explored as yet, you CAN use the Widcomm drivers to use a Bluetooth headset (headphone + mic combo) with your computer. Read all about configuring this at -

http://www.windowsdevcenter.com/pub/a/windows/2005/07/05/bluetooth.html?page=4

(d) You can also use Bluetooth to connect to Internet using a GPRS enabled mobile phone (another feature we haven't explored as yet). Read about the rudiments of this at -

http://www.geekzone.co.nz/content.asp?contentid=1524

(NOTE - You CAN achieve the same, albeit in a not so intuitive manner, with Microsoft's Bluetooth protocol stack as well. Check out the links given earlier for info on doing this).

So, are we happy? You bet we are. The next step is to buy our own Bluetooth dongle and explore the unexplored. And as they say in that McDonald ad, I am loving it :)

Some articles on Bluetooth theoretical basics -

http://www.mobileinfo.com/Bluetooth/FAQ.htm

http://www.bluetooth.com/Bluetooth/Learn/Basics


Sunday, November 05, 2006

About ID3 Tags and CDDB / FreeDB Databases

I have always been the kind of guy who likes to explore things on a need-to-know basis. When you are curious to know about something, you understand it better. In fact, that is how I recommend our new age education system should be like... Arouse a child's curiosity and you can make him learn anything.


The other day bacchi was ripping songs from a couple of hindi oldies discs that we have. We intended to later transfer them to our iPOD. The frustrating part was that
the mp3s created all had names that did not even remotely tell us which song it was (track 1, track 2 etc.). Now, I knew vaguely that there was a way I could associate these tracks with specific names, artists, albums, genre etc. So, I fired up google and started reading...

"ID3" in ID3 tags actually is an acronym which stands for "IDentify an MP3". As is clear from the name itself, ID3 tags are specifically associated with the MP3 format files to add "textual / graphical" information to them. So, what is analogous to ID3 tags for the other new age formats? you may ask. Well, read about it yourself at -

http://www.id3.org/intro.html


ID3 is actually a container which helps add meta data like artist name, genre, album, lyrics, album art etc. to a MP3 file. Its first version was ID3v1. It suffered with limitati
ons like it being a fixed-size 128-byte tag that resided at the end of the audio file. It could include title, artist, album, year, genre and a comment field. Also, the fact that it resided at the end of the file, made it a very unattractive proposition to be used with streaming media. After all, what was the use of being able to see the artist's name once the song was over? These limitations prompted the need to create a II version of ID3 tag, its more popular variant, ID3v2. To quote from ID3.org -

"ID3v2 is a new tagging system that lets you put enriching and relevant infor
mation about your audio files within them. In more down to earth terms, ID3v2 is a chunk of data prepended to the binary audio data. Each ID3v2 tag holds one or more smaller chunks of information, called frames. These frames can contain any kind of information and data you could think of such as title, album, performer, website, lyrics, equalizer presets, pictures etc."

(http://www.id3.org/easy.html)

The next question is how to edit ID3 tags and put all sorts of useful information in them. There are a lot of tools out there which can help you edit ID3 tags. In fact, Wind
ows XP also allows you to edit some amount of ID3 information natively (it is an ID3 aware OS, you may say).

ID3 tags can be edited in Windows XP by bringing up
a file's properties and navigating to the summary of the file. From here, under the advanced view, tags such as Artist, Album, Year, Track Number, Genre, and Title can be edited. However, XP doesn't allow the user to edit advanced parameters, such as album cover and lyrics.

(http://en.wikipedia.org/wiki/ID3)


However, my experience told me that Windows XP was woefully inadequate t
o edit ID3 tag information. For most of the files, it won't even show up all the information as editable. Hence, the need to try a tool like ID3 TagIT (http://www.id3-tagit.de). The high point of this tool was its ability to batch edit the ID3 tags. This is especially handy if you have a huge MP3 collection waiting to be 'tagged'. My only grouse with this tool was that while most of the information I filled in using this tool, got updated fine in my iTunes Music Library, iTunes just refused to detect the album art I updated in the ID3 tags using this tool. Now, whether it was iTunes playing the spoilsport or whether it was the Tag editor at fault, I could never diagnose for sure. But, being stuck up with iTunes to transfer my MP3 to our iPOD, I ended up using the Tag editor built into iTunes to edit the tags. iTunes has a very easy way to edit the ID3 tag information. You can read more about this at the following CNet site -

http://www.cnet.com/4520-7899_1-6306475-1.html?tag=more


Also, read about how to get the ID3 album art to display on your iPOD screen at -

http://docs.info.apple.com/article.html?artnum=300262

The most critical thing about the latter is that you must update the album art info in the mp3s BEFORE you transfer them to your iPOD.

To enjoy this feature, just make s
ure the "Display album artwork on your iPod" preference is selected in iTunes before you update your iPod.

In case you had enough of these ID3 tags, lemme tell you, very briefly, about a quick way of getting these tags updated automatically when you are ripping tracks from a CD and converting them into the MP3 format - "online CD databases like Gracenote's CDDB database and the open source project, FreeDB." Most of the CD ripper applications (incl. Apple's own iTunes) are linked to either one of these databases to automatically get the tag information about the tracks in the CD.

To look up CD information over the Internet, a client program calculates a nearly unique disc ID and then queries the database. If the disc is in the database, the client is able to retrieve and display the artist, album title, tracklist and some additional information.

(http://en.wikipedia.org/wiki/FreeDB)


Gracenote's CDDB database is a database which started off as users submitting tag information to a shared online database, now dubbed as CDDB1 (by Gracenote). While submission to this database is still (obviously) free (though the final inclusion is now monitored by Gracenote), application developers have to pay some fee to link to this database. Being in existence for a much longer time, it has far more inform
ation than its cousins like the open source project FreeDB (www.freedb.org) OR Musicbrainz (www.musicbrainz.org). Apple's iTunes links to the the Gracenote CDDB (or more accurately, CDDB2) database to get access to the track related information about the CDs you 'import' (Apple does not call it ripping) using it. Read all about importing files from CDs using iTunes at -

http://www.askdavetaylor.com/how_do_i_have_itunes_rip_cds_into_mp3_format.html

and

http://www.apple.com/itunes/hottips/

I am still too lazy to go about reorganizing my entire music collection (it fills up GBs of space on my hard drive) with the right ID3 tags. But, I now know how to get my little software toolkit to do that automatically for me the next time I choose to rip
a song to my hard drive.

Saturday, September 30, 2006

Finally bit The Apple

Well, we have finally bit 'The Apple'. Yes, it is THE Apple, because it does not stand for the source of Adam and Eve's (and consequently all human beings') miseries. Rather, here it refers to our family's finally hopping onto the Steve Job Apple Corp bandwagon. Bacchi, it seems had decided to gift me a portable MP3 player on my b'day and on our recent visit to the mall, we all of a sudden decided to go for an iPOD. After considering all the factors - form factor, cost, storage capacity etc., we settled down for an iPOD Nano Gen 2 player with a storage capacity of 2 GB (differs from the I generation Nanos as per the features listed at - http://www.apple.com/pr/library/2006/sep/12nano.html).
I must admit, though, that the iPOD Nano met with some tough competition from its hard drive based 30 GB cousin - iPOD Video. However, cost considerations, battery life and the very improbability of ever actually using the iPOD to watch videos, won the day for Nano.

Now, let me talk about what went wrong in our first attempt to get our new toy to work...

1. Since, we had used the player with a Macintosh at the shop we had purchased it from, the player got formatted with the Macintosh's HFS Plus file system. So, no matter how hard we tried, the player would not get detected by our home PC. Fortunately, there is an article at apple.com which actually talks about how to get the player to again work with Window.

http://docs.info.apple.com/article.html?artnum=61672

An excerpt from the article -

You cannot use an iPod whose disk is configured for Macintosh on a Windows-compatible computer. However, you can restore the iPod disk to use it with a Windows-compatible computer. To do this, see "Restoring iPod to factory settings." While a Windows formatted iPod may work on a Mac, Apple supports this configuration only with iPod shuffle.

2. In our eager attempts to get the iPOD functional as soon as possible, we bypassed downloading the latest version of iTUNE software, iTUNE version 7.0. A BIG mistake! as it later turned out to be... The old iTUNE software that I had loaded from a CHIP DVD, failed to recognize the player. Also, running quite true to the adage - "A little knowledge can be dangerous", I ended up corrupting the entire software present on the player. Finally, this apple article helped me restore the player to its factory condition -

http://docs.info.apple.com/article.html?artnum=60983

It is important to understand the difference between "update" and "restore". Update simply installs the software that controls iPod and does not affect the songs and files stored on iPod's disk. Restore erases the iPod's disk and restores iPod to its original factory condition.

3. New iPOD users may also note that Apple claims that a 5 Rs troubleshooting methodology will fix most of the issues with the iPOD players. You can read about these 5 Rs

Reset, Retry, Restart, Reinstall, Restore.

at - http://www.apple.com/support/ipod/five_rs/

4. Well once we had the iPOD detected by our PC, it was time to actually start transferring music to it. The tutorials available at this link were a great assistance in helping us harness the full potential of our iPOD -

http://www.apple.com/support/ipod/tutorial/index.html

5. Also, if you like me, are interested in using your iPOD as a USB storage device as well, do make sure that you go through the article at this link -

http://docs.info.apple.com/article.html?artnum=61131

Select "Enable disk use" or "Manually manage songs and playlists". Either one will allow you to use iPod as a drive. If you select "Manually manage songs and playlists", iTunes won't automatically update iPod with the iTunes library. If you want iTunes to automatically update your iPod, select "Enable disk use" instead.

6. And finally something I stumbled across in course of my research. According to the apple article at this link -

http://docs.info.apple.com/article.html?artnum=61131

you cannot access the songs transferred to the iPOD using the iTUNES software (a means to control illegal music sharing, I suppose).

When you use your iPod as a hard disk, you can't see the media iTunes copies to your iPod in the Finder or My Computer. This is normal. Using the Finder or My Computer, you can't copy these media files from your iPod back to iTunes or to any other computer. The synchronization between your iPod and your computer is one way: from iTunes to iPod.

However, the steps given in the article at this link, easily enabled us to accomplish this seemingly 'impossible' task -

http://www.cnet.com/4520-7899_1-6477981-1.html

I must admit that once we had the initial migration blues sorted out, we really started to enjoy our latest acquisition. I think, one thing that makes the iPOD such a cool gadget is the very design of the device - the soft aluminium body, subtle shades, sharp fonts and a high resolution (although small) screen. No wonder, we are hooked for good.

Saturday, September 23, 2006

Safely Remove Hardware

I have lately been reading about "Safely Remove Hardware" option in Windows. Here are some details I have found about this feature -

(1) Was first introduced in Windows ME. Has since been a part of Windows 2000 and Windows XP. Windows 98, unfortunately, lacked this feature.

(2) As Garycase has clarified on Experts Exchange -


There are two issues associated with removing a USB device: (1) possible data corruption; and (2) possible electrical damage. For (1) the problem is that Windows does deferred writes to removeable devices, and if you remove one before it has completed the write process (which can be several seconds after it's "apparently" done) you will have a corrupted drive. As noted above, if you change the settings for the device to optimize it for quick removal, you can disable the write caching feature and then you don't have to worry about this ==> but it will make writes MUCH slower, particularly when copying many small files, as it will close the directory after each file. For (2) there's no workaround -- you're simply taking a risk every time you pull the device out; and any electrical "glitch" can damage either the device itself or your PC's USB port. There are MANY examples in questions here on EE where folks have destroyed USB flash drives; their USB ports; an MP3 player; etc. by not following the "Safely Remove" protocol.

Bottom line: Think of "Safely Remove" as a seat belt. You'll "get by" without using it MOST of the time; but at some point you'll have an accident (i.e. you'll damage your device) and then you'll wish you had used it. If you aren't patient enough to do so, just keep "yanking away" ==> but don't be surprised when your device fails.

Additional note: If a device is self-powered (i.e. uses no power from the USB bus), and is ONLY used for reading data from the device (no writes), then it is much safer to simply "pull" the device. Common devices in this category are digital cameras, or compact flash cards used in powered external readers (e.g. a card reader slot on an all-in-one printer). In those cases, it's "okay" to just pull the device ==> since there's no power issue with the bus and no deferred writes (since nothing's been written to the device).

(3) The "data corruption" issues asssociated with not using "Safely Remove Hardware" option are also discussed in detail over here -

Changes in Windows XP Beta 2

Refinements to Caching Policy for Consumer Storage
Essentially, anything a user can physically remove from a machine could be removed from a running system without prior warning to the operating system - for example, any kind of device on CardBus, PC Card, USB, IEEE 1394, and so on. However, the area of greatest concern is storage devices, because of the possibility of data loss or corruption when surprise removal of these devices occurs.

To mitigate the likelihood of data loss in these scenarios, Windows XP has a refined caching policy for removable storage. As of Windows XP Beta 2, for consumer-oriented removable storage (USB, Flash, Zip, and so on), write caching is disabled by default.

Disabling write caching means that, instead of saving up changes for a file on a removable storage device and then doing a bulk write, Windows XP writes changes to the file as the changes are made. This keeps data on removable storage devices more current, mitigating the likelihood of data loss. However, disabling write caching also has a performance impact. Therefore, for IEEE 1394 hard disk drives, Windows applies a special case for the default caching policy by not disabling write caching for these devices.

The basic way to think of write caching policy is:
- If write caching is disabled by default, the storage device in question is optimized for safe surprise removal. This is the appropriate action for slower, consumer-oriented storage devices such as flash-type memory.
- If write caching is enabled by default, the storage device in question is optimized for performance. This is the appropriate action for high-performance storage such as SCSI and IEEE 1394 hard disk drives.

Note that caching policy defaults for a given device can be changed in Device Manager.

Optimizing the Default Caching Policy
As noted earlier, in Windows XP Beta 2, IEEE 1394 hard disk drives have write caching enabled by default, to optimize for performance rather than for safe surprise removal. This also means users should first stop IEEE 1394 hard disk drives using the hotplug applet before removing them. However, the Beta 2 mechanism for special-casing IEEE 1394 hard disk drives requires additional refinement.

This content has been culled from the Microsoft site - http://www.microsoft.com/whdc/system/pnppwr/hotadd/XPrem-devs.mspx

(4) Is applicable for all hot swappable devices like - IEEE 1394 devices and USB devices.

(5) In case, you got a hot swappable mass storage device plugged in and you do NOT get the "Safely Remove Hardware" option to STOP the device before unplugging it, you can use the following instructions to manually invoke the "Safely Remove Hardware" option -

You can click on Start, Run..., and type in:
RunDll32.exe shell32.dll,Control_RunDLL hotplug.dll
And press OK.
That will bring up the "Safely Remove Hardware" dialog.
A side effect could be that the "Safely Remove Hardware" icon reappears as it should.
If it happens often enough, you can create a desktop shortcut for this geeky looking command.

These instructions have been pulled from the site -
http://ask-leo.com/safely_remove_hardware_where_did_the_icon_go_how_do_i_safely_remove_hardware_without_it.html

(6) Bottom line -

If it is a hot swappable mass storage device, you MUST stop the device before you unplug it. In this case, you might go to the extent of manually invoking the "Safely Remove Hardware" wizard.
If it is just any other hot swappable device and is self powered, go ahead, unplug it without any need to STOP the device.
If it is a hot swappable device, NOT self powered and NOT a mass storage device, see if you can locate the "Safely Remove Hardware" wizard. If you can, stop the device before you unplug it. If you cannot, well go ahead and yank it out anyway.


Saturday, December 10, 2005

Morpheus to BitTorrents


I recently embarked on a long cherished dream of mine - Peer to Peer Networking. I remember the first time I got introduced to this concept was when I was training with the PCQuest labs. Those were the days of AudioGalaxy and Napster. I revisited the concept, at least the theoritical aspect of it, when I delivered a seminar on it while at college. A casual discussion in the cab back home from work recently, reinstated the fire in me to actually check out the world of P2P in practise.

My first attempt to join the P2P community was Morpheus. Lots of computer magazines had lately been recommending this client as the best in the business. However, as luck would have it, Morpheus refused to work when I switched from Norton Internet Security 2005 to freeware alternatives like Avast! AntiVirus and Zone Alarm. The client seemed to keep crashing on me. Hence, I made the switch to LimeWire.

The more I explored LimeWire, the more I liked it. It is one of those rare P2P clients completely free from Spyware. It is fast and its interface looks really groovy, what with its lemon green color and its similarity to Morpheus in terrms of functionality (making the transition much easier for me). It can not connect to netwoks apart from Gnutella to share files (unlike Morpheus), but, heck! what do I care as long as it can find the file I am looking for and find it fast. And boy! is LimeWire fast or what? I liked LimeWire so much that one of the first applications I installed when I made the final cross over - from Windows to Linux, was LimeWire. More about the pains of that installation (more so cause of my limited knowledge of Linux, then any actual problem with the LimeWire RPM) later...

The latest thing to rock the P2P world is Bit Torrents, and it seemed, but logical, that I would bump across it some day. Like many of the world's greatest discoveries, my initiation to Bit Torrents, was by chance. I happened to be searching for the video of 'Right here, right now' from the movie Bluffmaster. I had already scoured the Gnutella network for it with LimeWire without any luck. And then, I came across this video at www.desitorrents.com while googling for it. That is where I found the torrent file for the same. I downloaded the file and it started the actual video download automatically in the BitTorrent client, thoughtfully bundled with my Linux distribution. And the rest, as they say, is history.

So, what is it about BitTorrents, that excites me so much?
BitTorrent refers to both the protocol and the very first client, used to share large files on the Internet. What is so special about the BitTorrent network is its architecture. Unlike the traditional, server-client architecture where the performance of the server diminshes with increasing client load, the performance of the BitTorrent network actually improves as more and more clients share a file.

How does it work?
Say, I want to share a file with others on BitTorrent, I will first create a .torrent file that will contain meta-data (data about data) like filename, size, address of 'Tracker server' (discussed later) and post it on some web-site like www.desitorrents.com. Users will be required to download this torrent file and open it up in their BitTorrent client. This will start the actual download process on their machines. When a BitTorrent user is downloading a file, he is called a 'Peer'. However, a Peer's BitTorrent software, unlike the traditional P2P clients would not simply be downloading the concerned file, but, would also be making available blocks of it to the other users of the BitTorrent network, simultaneously. So, a BitTorrent client doesn't simply download files from Peers who have the complete file on their machines, but also from Peers, who are still downloading that file. Peers like me, who have the complete file and are yet running BitTorrent clients on their computers, to make the file available to other users, are known as 'Seeds'. Conversely, Peers, who while downloading the file, artificially throttle the uploading, are known as 'Leechs'. The BitTorrent protocol is so designed that it rewards the Seeds with better bandwidth than Leechs . Also, a BitTorrent client always tries to fetch the rarest blocks of a file first. This ensures, that the number of Peers, a BitTorrent client can download a particular block of the file from, keeps growing. All the Peers engaged in downloading (and uploading) a particular torrent are known as a 'Swarm'. Tracker server is the server which manages this Swarm. It keeps a log of which users are downloading a file and where the different blocks of the file reside.

How can I contribute to the BitTorrent network?
As you can make out from the description of the BitTorrent's architecture, the speed of the network depends a lot on the Seeds and on the users who do not throttle the uploads being carried out by their BitTorrent client. It is gnerally considered a good practise to leave one's BitTorrent client running after finishing a particular download. The ratio of the MBs uploaded to the MBs downloaded is known as the 'Share Ratio'. Most BiTorrent clients report this Share Ratio, as well as allow you to adjust the upload speed. A Share Ratio of 1.00 is generally considered ideal (give back as much as you get).

NOTE - In its latest avatar, the BitTorrent protocol has also eliminated the need of centralized Tracker servers to maintain the Swarm.

Reference URLs -

(1) The BitTorrent Wiki -
http://en.wikipedia.org/wiki/Bit_torrent
http://en.wikipedia.org/wiki/BitTorrent_client

(2) http://blog.commonbits.org/2005/05/how_to_start_us.html

(3) About.com article -
http://compnetworking.about.com/od/p2ppeertopeer/g/bldef_torrent.htm

Sunday, November 27, 2005

Email Spoofing

Lemme give you a simple example of an email spoof -

1. Open up telnet. Here's how I did that on my Windows 98 SE based machine.
Start > Run > Command
And on command prompt,
telnet
This opened up the Telnet interface.
Click on Connect > Remote System
Type in Hostname as
mail.xyz.com //the mail server name of the target of the spoof.
Port name as 25
Leave the Terminal type as the default vt100

2. The SMTP daemon listening on the port 25 of the mail server will respond as
220... ESMTP
indicating that it is using the ESMTP protocol and is ready to establish a mail connection
You then need to type in
HELO mail.abc.com //the domain name of mail server you want the mail to appear to come from
or
EHLO mail.abc.com
(NOTE - You won't be able to see the commands YOU are typing in the Telnet window. The only lines you will see in the terminal window will be the replies.)
The reply would be
250 OK
If the server is using the ESMTP protocol and you give a EHLO command, you will also get a list of some commands supported by the server.
Now type in
MAIL FROM:john@abc.com //the email address the mail would seem to come from
Reply -
250 OK
and then
RCPT TO:mary@xyz.com //the receipient of the spoofed email
Reply -
250 OK
Then
DATA
Reply -
354 Go ahead
Feed in
FROM: JOHN

TO: MARY
SUBJECT: You are the victim of a prank

Hi, you have been subjected to a prank
.
Reply -
250 OK
Enter
RSET
Reply -
250 OK
Enter
Quit

Reply -
221 Bye

If Mary now checks her mail box - mary@abc.com, she will find a mail from John (john@xyz.com) with the subject line 'You are the victim of a prank' EVEN though John never sent that email. This is how spammers and virus propagators work...

You can read more about this spoof and the different SMTP commands at -
http://helpdesk.islandnet.com/pep/smtp.php
AND
http://www.networksorcery.com/enp/protocol/smtp.htm

Wednesday, November 23, 2005

Freeware Revolution

This post comes after a substantial gap...

It was a long time back that I read about the freeware revolution. At that time, it hardly seemed plausible that one day I would be able to replace almost all the properietary software on my computer with freeware and yet derive the same level of functionality. Today, I see it happening right before my eyes on my home computer...

Some freeware applications I am willing to swear by -

Office suite - OpenOffice.org suite
Anti virus - Avast! Home Edition
Anti Spyware - Spybot Search and Destroy
Firewall - Zone Alarm
Browser - Firefox
Instant Messenger client - Trillian
RSS Reader - Sage (the extension for Firefox)
RSS Builder - IceRocket.com
Music Player - Winamp
P2P client - Limewire

May God bless all these freeware vendors for the kind of effort they are putting in to make the computing experience both secure and enjoyable for everybody!

Sunday, October 09, 2005

Codecs Revisited...

I had promised that I will revisit codecs soon... Here's a mish-mash of what I learnt about codecs (and other related concepts), this weekend.

CODECS

Compresser - Decompressor.
An application can use the codec installed in the OS (visible under the Control Panel > Multimedia > Devices section), the codec built as a default plugin into the application OR the codec available for download as a separate plugin.

Quality Ranking of some popular Audio codecs -
1. MP3 (LOSSY, NOT SO GOOD)
Tools used:
Use LAME mp3 encoder to create MP3.
Can also use Windows Media Player Version (WMP) 10 (the version 9, did not support encoding to MP3).
2. AAC, OGG (LOSSY, BETTER)
Tools used:
Use OggdropXPdv to create OGG vorbis.
Use iTunes to create AAC.
3. WMA (LOSSLESS, MUCH BETTER)
Tools used:
Use WMP.
4. WAV (BEST)
The 'Swiss Army Knife' of conversion software -
dbpowerAMP.


CONTAINER FORMATS
File formats used to store the video stream and audio stream created by a video codec and an audio codec respectively (might also be used to store only the audio stream along with the meta data). It also contains data to synchronize video and audio playback. That is how it differs from simple file archiving formats like zip files.
e.g. -
Containers exclusive to Audio -
WAV

Video and Audio supporting containers -
AVI - The popular container format used by Microsoft. Supported by Windows Media Player. Is the format used with DivX movies (at least the ones based on the DivX codecs upto 5.2)
MOV - Container format for files playable by QuickTime.
OGG
DivX

Ref URL -
http://www.matroska.org/technical/guides/faq/
http://en.wikipedia.org/wiki/Container_format


LAME
Stands for 'Lame Ain't an Mp3 Encoder'. The reason it was named as such was cause it was not designed to be a MP3 encoder initially. There are two versions of it -
(a) A command line utility - LAME Mp3 encoder. Might have a GUI front end to it e.g. - LameFE or RazorLAME. Also used with an output plugin for Winamp, named, out_lame.
(b) LAME ACM codec - The ACM codec version of the LAME encoder. Is installed as an audio codec in Windows and can be used, for example, with programs like FlaskMPEG to create DivX video based AVIs.

Using LAME -
Command line utility -
Can use some wonderful presets to forget learning all the different switches available in the command line utility.
ArsTechnia recommends -
--alt-preset standard. Is a VBR preset that uses an approximate bit rate of 190 Kbps AND bit rate fluctuation between 180-220 Kbps.
Using RazorLAME -
http://arstechnica.com/guides/tweaks/encoding.ars/5
Using Out_lame plugin -
http://www.free-codecs.com/download/out_lame.htm

Some other MP3 encoders -
Radium MP3 encoder, Fraunhofer encoder.

Ref URL -
http://www.free-codecs.com/download/Lame_Encoder.htm]
http://www.snipurl.com/ianq


DivX
A video codec. Esp. used to encode DVD MPEG2 files to MPEG4. Primary objective - compression.

Can download the latest version of the codec -
For Windows 2K and XP - Version 6.0
DivX Play bundle:
A codec + player version - Just to play DivX movies available on the Internet
DivX create bundle:
Codec + Encoder + Player (has a TRIAL version which canNOT convert DVD MPEG2 files without installing a PAID plugin)

For Windows 98, ME - Version 5.2
http://www.divx-digest.com/software/divxcodec5.html
Download the DivX Pro, Windows 98 and ME trial version from this page.

DivX Players:
Windows Media Player can also play DivX AVI files, if the proper codec is installed.

Configuring the DivX 5.2 codec for best results -
http://www.divx-digest.com/articles/divx52_setup.html
http://www.magicdvdripper.com/improve-divx-quality.htm

Other video codecs available -
xVid, Windows Media Video


How to uninstall a codec in Windows?
Do it from Control Panel > Multimedia > Devices > Audio / Video codec
Double click on the app codec and click on Remove. That is how I uninstalled LAME ACM codec after it began crashing my FlaskMPEG program.


How to uninstall a Winamp Plugin?
http://forums.winamp.com/showthread.php?threadid=26610


How to convert DVDs to DivX?
Use FlaskMPEG -
http://www.digital-digest.com/dvd/articles/dvdtodivx.html
Use MagicDVDripper -
http://www.magicdvdripper.com/

The common steps in the DVD to DivX conversion process (irrespective of the tools used) -
(a) Ripping the DVD (transfer the contents of the DVD - the video_ts folder) to the HDD, while removing the CSS encryption built into the DVD. The CSS encryption prevents the DVD's video_ts folder from being copied directly to the HDD. Can use tools like - MagicDVDRipper OR DVD Decrypter to rip.
Ref URL -
http://www.riphelp.com/articles/dvdripping_2.html

(b) Setting the conversion player options (e.g. - FlaskMPEG)

(c) Selecting the video codec and configuring it for optimum settings.

(d) Selecting the audio codec and setting its optimals.

(e) Actual conversion (One Pass or MultiPass, the latter results in a better quality file). Takes almost 8-10 hrs.

(f) Post conversion tweaks.


About CBR, VBR and ABR
CBR - Bit Rate stays constant once selected.
VBR - Bit Rate keeps changing depending on the amount of data to be encoded. Results in a smaller and a better sounding file.
ABR - VBR but the bit rate fluctuates around an average value.
Quality ranking -
VBR > ABR > CBR.
Ref URL -
http://arstechnica.com/guides/tweaks/encoding.ars/1

Friday, September 16, 2005

Digital Audio Extraction (DAE)


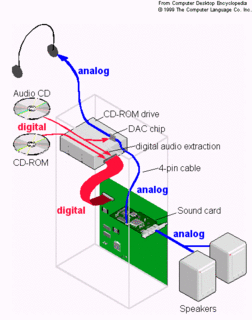
(a) DAE means accessing the data on an Audio CD in a digital format, transferring it through the IDE channel and then using the CPU to route it to the Sound Card for Digital-to-Audio conversion.

(b) In computers of yester years, we had a molex cable, called the 'Audio cable' that was used to transfer pre-processed analog data from the CDROM to the sound card. In case the sound card was integrated into the motherboard, this cable linked the CDROM to the MB. In such kind of a setup, one could listen to music by plugging in a pair of headphones into the headphone jack of the CDROM drive. Further, you also had the facility of controlling Audio CD playback using the Volume controls built into the CDROM drive's front panel OR using the CD Player option in the Windows Volume Controls.

(c) The Audio cable was replaced in the new age systems with DAE. DAE, does not require a cable to connect the CDROM to the Sound Card. Also, since the data processing is no longer being carried out in the drive, the headphone jack and the volume controls on the drive would no longer function. Nor will the CD Player controls built into Windows, control the Audio CD volume.

(d) NOTES:
- In case BOTH an audio cable and DAE is being used, DAE takes precedence over the former.
- Since the CDROM works like any other CD Player available in the market, with DAE disabled; you can use the headphone jack of the CDROM to listen to Audio CDs, even without the Audio cable plugged in.
Ref URL - http://www.epanorama.net/documents/pc/cdrom_audio_wire.html

(e) DAE can be enabled at 2 levels - at the OS level OR the Application level. By that logic, it also means that if you want to disable DAE, you HAVE to do it at both the levels. NOTE: At the OS level DAE is right now only supported by Windows XP (among that Microsoft OSs, that is).

You can turn it ON in Windows XP by -
1. Right-click My Computer, and then click Properties.
2. Click the Hardware tab, and then click Device Manager.
3. Locate the CD-ROM, and then click the plus sign (+) in front of the device.
4. Right-click the CD-ROM drive, and then click Properties.
5. Click the Properties tab.
6. Click to check "Enable digital CD-ROM audio for this CD-ROM device" option, and then click OK.


To turn it ON in Windows Media Player version 7 (and above) follow the instructions given at -
http://support.microsoft.com/default.aspx?scid=kb;en-us;296615

To turn it ON in Winamp 2.x series, install the input plugin available at -
http://www.url.ru/~copah/CDReader.htm

I haven't tried it in Winamp 3.x and above, but I think this should work -
1. Go to Preferences (Ctrl+P) > Plugins > Input > in_cdda.dll > Config.
2. Check "Use Digital Audio Extraction"
3. Close Preferences.
4. Close Winamp.


Wednesday, September 07, 2005

Keeping your system secure

I recently switched over to Broadband. With Broadband comes an increased threat of virus and spyware infections. True to my fears, my system started behaving erratically within days of going 'always-on'. Cornered, I decide to embark on this expedition to secure my system against all the dreadful stuff doing the rounds on the Internet. Here are my recommendations -

(a) A good Firewall:
From what I have heard, Zone Alarm is a b'ful free firewall program. I opted for the 90 days Trial version of Norton Internet Security 2005, though. It comes with a time-tested personal firewall solution.

(b) An Anti-virus: Now, where have we heard this before. ;) Trend Micro has a decent free AV for offering. I personally recommend, Norton AV, if u have the money to shell out, that is.

(c) An Anti-spyware program: Get two of these in fact. While two AVs behave like two wives in one house, two anti-spyware programs work like comrades-in-arms in protecting your system. I would recommend Spybot S and D and Microsoft Anti-Spyware Beta. I am running Spybot S and D alone at present. Why? Cause I use Windows 98 SE and MAS Beta, unfortunately, only supports Windows 2K and XP platforms.

(d) An Anti-spam solution: Haven't configured any mail client on my system as yet. But, most web-based mail services do seem to have good spam filters in place. On a different note, NIS 2005, comes bundled with a Anti-spam software.

So, right now the burden of protecting my system rests on the tried and tested shoulders of - NIS 2005 and Spybot S and D. And trust me, I 'zealously' update these two software with the latest definitions every week.

P.S -

I had some doubts about the anti-spyware defintions update capability of MAS Beta 1. The following articles made a believer out of me, though -

http://malektips.com/microsoft_antispyware_0011.html

http://snipurl.com/fqur

Friday, August 19, 2005

Printing to a USB printer from a MS DOS application

(A) Windows 2000 and XP -

MS DOS applications are by default designed to print to the LPT port.. To make them work with USB printers, here's what u need to do -

1. Find out if the computer connects to a network or is a stand-alone machine. If it connects to the network, find out the IP ADDRESS of the machine using the ipconfig command and move to step 2. If it is a stand-alone machine, you need to do the following -
- Go to 'Add New Hardware' wizard from the Control Panel.
- After it is done detecting any plug n play devices connected to the computer, choose the option - 'Yes, I have already connected the hardware'. Click Next.
- Choose 'Add New hardware' in the list of devices and click Next.
- Choose the option 'Install the hardware I manually select from the list'.
- Choose 'Network Adapters' in the list that comes up.
- In the next window, choose 'Microsoft' as the manufacturer AND select the 'Microsoft Loopback Adapter' from the list of adapters listed.
- The wizard will copy the requisite files and install the Microsoft Loopback Adapter. Click Finish to end the wizard.
- The IP ADDRESS for the machine would now be - 127.0.0.1


2. Assign the USB connected printer a network name. To do that -
2.1 Note down the Computer Name from System Properties > Computer Name tab
2.2 Go into the Printer Properties from the 'Printers and Faxes' folder and assign a Share Name to the printer from the Sharing tab.
2.3 The printer's network name would be -
file://Computer_Name/Share_Name. You can also use file://IP_ADDRESS/Share_Name as the network name. Here, the IP ADDRESS would be the one noted down in the Step 1.
2.4 To verify that the printer's network name has been correctly assigned, open up command prompt and type the command -
C:>net view Computer Name
OR
C:>net view IP ADDRESS
If it shows the printer in the share name, proceed to step 2.

3. Map the printer network name to the LPT1 port. To do so -
3.1 Open up the command prompt and type in the command -
C:>net use lpt1
\\Computer_Name\Share_Name /persistent:YES
OR
C:>net use lpt1
\\127.0.0.1\Share_Name /persistent:YES
3.2 To verify whether the mapping has been done successfully, again use the command
C:>net view Computer_Name
OR
C:>net view IP ADDRESS
If it shows the printer mapped to the LPT1 port, proceed to Step 3.


4. Set the spool settings of the printer (from Printer Properties > Advanced tab) to "Print directly to the printer".

5. Now try to print from the MS DOS application...
Reference URLs -
http://www.decompile.com/dataflex/tips/usb_printer.htm
http://www.columbia.edu/~em36/wpdos/winprint.html

NOTE: Since, the Windows drivers for the printer will be used in the background, you don't need to have any MS DOS drivers for the Printer installed on your computer.


(B) For all Operating Systems (and the only method for Windows 9x and ME systems) -

1. Download and install 'DOSprn' shareware application from the URL -
http://www.dosprn.com/

2. Restart the system AFTER you have installed the application.

3. Try to print from the MS DOS application… The default DOSprn settings are good enough.
Reference URLs -
http://www.sacpcug.org/archives/0306/prc0603.html

NOTE: This program is a shareware. You can use it to print upto 100 documents while it is unregistered. To keep using it beyond that point, you need to register it. A single user license costs $12.95. You can know more about this at -
http://www.dosprn.com/faq.htm#1

The reason, I would not prefer using DOSprn to print from NT-based systems is because we have a free workaround available in the form of the method listed above.

Thursday, August 18, 2005

Manage Add-ons in IE 6 SP2

This is the official Microsoft explanation for the different options available in the BHO manager built into IE 6 SP2 -

"The Add-on Manager allows you to see a list of all the add-ons for Internet Explorer. The list is divided into two categories:

- Add-ons that have been used by Internet Explorer: a complete list of the add-ons that reside on your computer.

- Add-ons currently loaded in Internet Explorer: the add-ons that were needed for the current Web page or a recently viewed Web page."


Ref URL - http://www.microsoft.com/windowsxp/using/web/sp2_addonmanager.mspx

So, which Add-ons should you focus on???
Make the changes to the 'Add-ons currently loaded in Internet Explorer' list. They will get reflected in the other list automatically...

Tuesday, August 16, 2005

Mozilla Firefox versus Internet Explorer

"What's this thing about Firefox that is attracting more and more users towards it?" a casual question by bacchi, triggered this search to find which is a better browser - Firefox or Internet Explorer? Here's what I found -

PROS of Firefox relative to IE:

- Less prone to spyware infection. That is not only because IE being the more dominantly used browser is the more preferred target, but also because Firefox is ACTUALLY more secure. Being open source also helps.
Ref URL -
http://www.ad-mkt-review.com/public_html/air/ai200501.html

- Skins \ Themes. Microsoft does not provide any skins for IE. Only 3rd party firms do.
Example of skins for IE:
http://www.davebax.com/ieskinsfantasy.html
NOTE: I was actually scared of installing any skin for IE. You can never say when you might be installing a spyware on your system. Use the skins on this site at your own discretion.

- Built in support for extensions. IE only has 3rd party plugins.

- Has a handy wizard to import IE, Netscape and Mozilla favorites, cookies, history and passwords.

- Popup blocker. Integrated into IE6 SP2 only... which is only available to people running Window XP and that too as a part of Windows XP SP2 patch and NOT as a separate download.

- No IE for Linux. The latest version of IE for Mac was IE 5. Moreover, Microsoft has stopped developing new versions of IE for Mac. And, it will only release updates to IE as a part of its service pack from now onwards.
Ref -
http://news.com.com/2100-1045_3-1017126.html (Cnet link)
In contrast, Firefox is available for all platforms.

- Integrated google / Yahoo... search. You don't need to install any special toolbars.

- Won't run programs known as Active X controls. Similar to Java applets (also run in browsers), these programs have full access to your OS.
An ActiveX control is essentially a Windows program that can be distributed from a web page. These controls can do literally anything a Windows program can do. That means you could write an ActiveX control to erase a hard drive. A control containing a virus or trojan can be written, distributed, and activated from a web page, and the viewer of the control might never know. A control could even scan your drive for tax records or documents the control's author was interested in, and e-mail them off to some other person. All this can be done in a control that pretends to be something interesting, like a video game.
Ref URL -
http://www.halcyon.com/mclain/ActiveX/Exploder/FAQ.htm

- Has integrated RSS Reader in its latest version.
Ref URL - http://forums.scotsnewsletter.com/index.php?showtopic=12867
The integrated RSS reader (or Live Bookmarks) is not as good as a full fledged RSS reader, though. Would recommend using 'Sage' instead. It is easy to use and gives you all the functionality you usually require.

- Firefox has a beautiful Password Manager. e.g.- the moment I tried to login to www.blogger.com to blog this post, the handy firefox password manager asked me whether I wanted to save my password for logging in automatically the next time. Any saved password is VERY easy to manage from the 'Saved Passwords' option in Firefox options. IE is supposed to have a password manager. BUT, it is non-existent, to say the least.
Ref URL -
http://support.microsoft.com/default.aspx?scid=kb;en-us;217148
for more information on the password manager in IE. The only problem is - it NEVER works.

- Download manager is built into the browser. You can pause and resume downloads whenever you want. Ref the interesting discussion at -
http://www.geekstogo.com/forum/Mozilla_Firefox_versus_Internet_Explorer-t47263.html

- The cleaner 'Options' interface. All the related options are grouped together.... Compare this to IE, which seems to hide its options in sooooooo many places.

- Is easy to uninstall if you do not like it. Compare this to IE... Microsoft seems intent on pushing it down our throats, in spite of all the litigations against it.

- Is a smaller download and uses lesser resources.

(Refer URL: http://ptech.wsj.com/archive/ptech-20041230.html
for some more stuff on FF versus IE...)

CONS:

- No support for BHOs. Browser Helper Objects (BHOs), though a heavily misused feature... can prove quite handy at times to add buttons / toolbars to the browser. IE 6 SP2 works better in this regard, it provides you a handy BHO manager to control 'add-ons'.
http://www.microsoft.com/windowsxp/using/web/sp2_addonmanager.mspx
In the older versions of IE you could disable BHOs by unchecking '3rd party browser extensions'. Ref URL -
http://support.microsoft.com/default.aspx?scid=kb;en-us;298931)

- No support for ActiveX. Yes, in spite of all the flaws, dropping support for a technology is not the solution. I say, leave the choice to the users (IE6 SP2, I almost hate to say this, does precisely that, through its 'Information bar' feature. For the older versions of IE, check out -
http://support.microsoft.com/default.aspx?scid=kb;en-us;154036)

- Has problems with web sites designed specifically with IE in mind.

- No patches to fix bugs. You have to download the latest version of Firefox to fix a bug.
http://www.theinquirer.net/?article=22634

- Have to install plugins for everything. The original download hardly comes with any plug-ins. You can download these plugins from -
http://www.mozilla.org/products/firefox/central.html#central-plugins
This site carries links to sites of most commonly used plugins. Whenever, you open up a site that requires the use of a plug-in, you automatically get taken through a wizard to download the required plugin. IE, however, does come with some plugins - flash, for instance.
Ref URL -
http://www.webmasterworld.com/forum104/43.htm
NOTE: I won't rank this as a major disadvantage with Firefox because of the ease with which even a non-techie user is taken through the plug-in download process, purely on a need-to-use basis.

- Earlier versions of Firefox took some time rendering images on web-sites. They seem to have fixed it with the latest versions though (I am using version 1.0.6).

Juicy tid-bits about both the browsers:

The browsing engine used by Firefox, Mozilla AND Netscape is known as 'Gecko'.

You can find links to other language versions of Firefox at -
http://www.mozilla.org/products/firefox/all.html

For more info on Firefox, check out -
http://www.nationmaster.com/encyclopedia/Mozilla-Firefox

Deer park is eventually gonna be Firefox version 1.5. It was earlier supposed to be known as Version 1.1. The current major release is 1.0.6.
Ref URL -
http://www.mozilla.org/projects/firefox/

For more information about IE version 7 (the forthcoming release), check out the URL:
http://www.microsoft.com/windows/IE/ie7/default.mspx

Latest security features in IE 6 SP2:
http://www.microsoft.com/windowsxp/sp2/ieoeoverview.mspx

Will write more about these two browsers soooooooooon... In the meantime, take your pick!