This weekend, after a long hiatus, I resumed work on some of the technical experiments I had since long meant to undertake. Ironically, fever and cold, helped me take that much needed break from work and exercise my technical muscles a little bit.
The first major experiment I carried out was ripping a DVD and converting it into the Xvid format. A DVD of the movie "Sorry Bhai" (and a really nice movie, I must add) served as the guinea pig for the experiment.
How I did it?
Step 1 - Ripped the DVD using DVD Decrypter.
DVD Decrypter is one of the best free DVD ripping tools available out there. It is "end of life" in the sense that no new versions of it are under development, but version 3.5.4, that I used, did the job fairly well. It is especially reknowned for its capability to copy protected DVDs and removing the region protection feature of the DVD while ripping.

How to use DVD Decrypter?
Download DVD Decrypter from http://www.dvddecrypter.org.uk/. It is a small 878 KB download (proving the adage that great things do come in small packages).
Install it & run it.
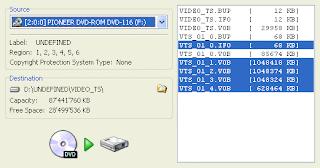
Load the DVD you want ripped in the DVD drive. DVD Decrypter will automatically detect it.
Switch to 'File' mode by clicking on "Mode" > "File".
By default, it will select all the relevant files
Alternatively, you can manually select all the files listed over here.
You can know more about exactly which files to rip if you read about the file structure of DVD Videos @ the websites like -
http://stream.uen.org/medsol/dvd/pages/dvd_format_filestructure.html
http://club.cdfreaks.com/f72/tutorial-dvd-video-file-structure-77646/
http://www.dvd-replica.com/DVD/data-2.php
Once you have selected the relevant files, you can specify a destination folder (make sure that there is ample free space available wherever you are choosing to save the ripped files).
The final action you need to undertake is to Click on the huge DVD to HDD icon to actually initiate the ripping procedure. The entire rip does not take more than 5-10 mins (at least that is how much it took for the DVD that I had ripped).
Step 2 - Covert the ripped file to Xvid (or DivX) format.
For this, you use a took called AutoGK. AutoGK (as the name suggests) completely automates the MPEG Layer 2 to MPEG Layer 4 conversion process.

How to use AutoGK?
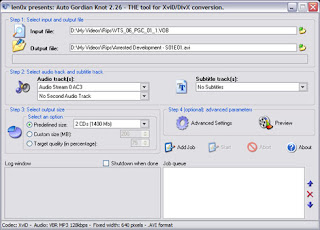
In the "Input File" section, just select the IFO file for the first video tile set (would normally be the VTS carrying the movie) - VTS_01_0.IFO. You can also select an individual VOB file from the title set to encode.In the "Output File" section, specify the name and destination of the output AVI.
You don't need to do anything in particular with the "Audio Track" and "Subtitle Track" sections. Leaving that to defaults will do.
Just specify the output size - selecting 700 MB (the average size of a DivX or Xvid file) might be a good idea.
Once, you have done all this, click "Add Job" and then click "Start".
Please be aware that DVD to DivX (/ Xvid) conversion is a very time consuming process (taking two passes in all). So, much so, that makers of AutoGK have included a "Shutdown when done" option in the AutoGK interface.
That is it, after a couple of hours, while you continue to use your PC for other purposes (except that it slows down the conversion process a little bit), you have a pretty handy 700 MB high quality movie file in your hand which you can be easily shared as a bittorrent.Some relevant websites that talk about the conversion process in greater detail are -
http://www.doom9.org/index.html?/autogk.htm
http://www.ehow.com/how_2309420_use-auto-gordian-knot.html
NOTE - Needless, to say both DVD Decrypter and AutoGK have several configuration options you can fiddle with to improve the quality of the final file. However, for a bare bones rip up and conversion, the instructions given above should suffice.
So, happy ripping to all of you :) Feel free to let me know how does it work out.


1 comment:
Nice articles, you should start blogging again.
Post a Comment